I want to teach you how to upload a video on YouTube in this article. ✅ In today’s digital world, YouTube is a powerful platform for video sharing, playing a pivotal role in shaping modern culture and communication. Every day, millions of videos are uploaded to this platform, ranging from educational and artistic content to entertainment and product reviews. Uploading videos to YouTube is not only an opportunity for creative expression, but it can also become a sustainable source of income and an influential tool for driving social change. However, the path is not always smooth. In this guide, we will explore the essential steps for uploading videos and provide practical tips to help you become a successful YouTuber.
Before uploading a video, you must first have a YouTube channel. If you haven’t created one yet, follow this tutorial.
How to make a youtube channel on laptop and PC
how to make a youtube channel on mobile
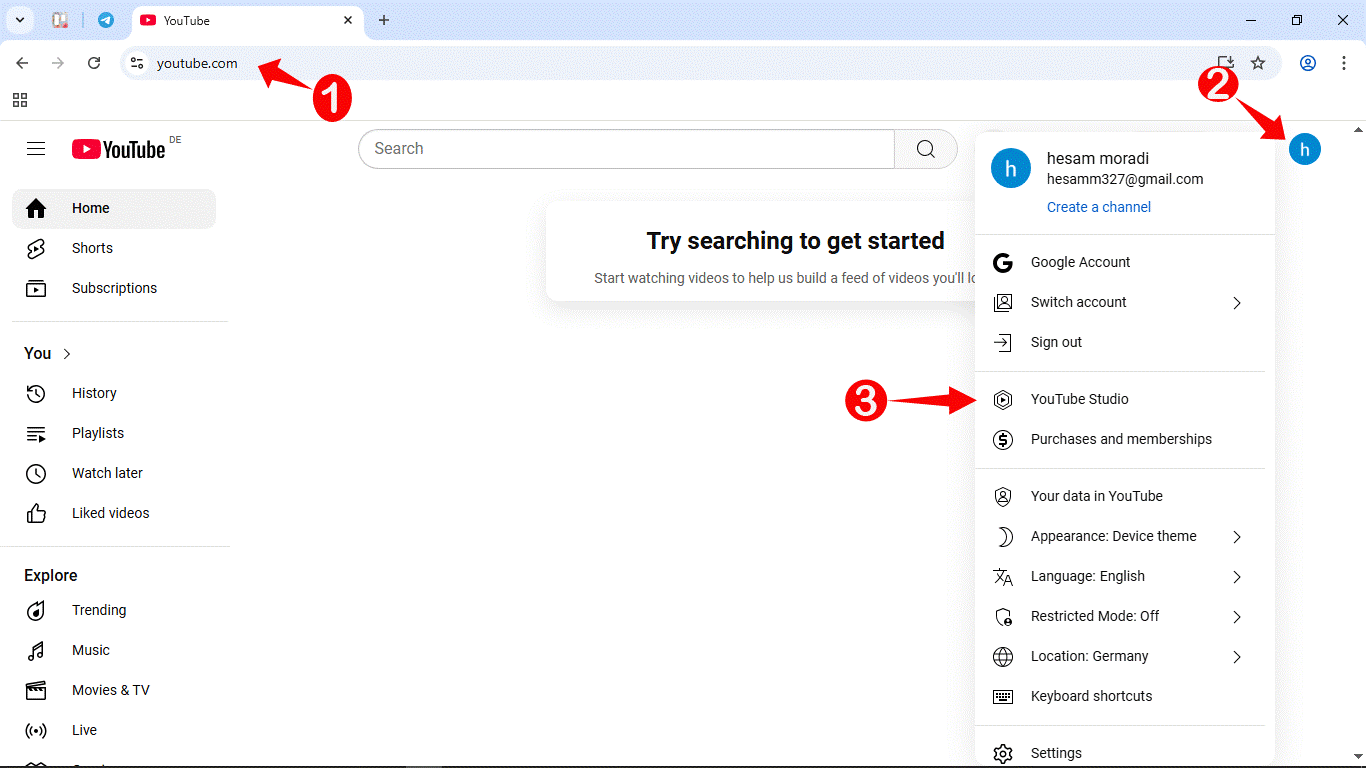
Then go to www.YouTube.com and click on your profile picture. Next, click on the YouTube Studio option to access the YouTube Studio page. https://studio.youtube.com
In the YouTube Studio window, click on the “Create” button and select “Upload videos.”
Then, in the new window that opens, click on “Select Files,” choose the video file you have prepared, and click “Open.”

An important point to note is that once your video has been fully uploaded, YouTube still needs to process it and make it available in various quality levels. Lower resolutions such as 360p, 480p, and 720p are typically processed within five minutes after upload. ذ
, if you are uploading your video in higher resolutions such as Full HD, 4K, or 8K, it is recommended to leave a gap of 3 to 4 hours between the time of upload and the time of publishing. This allows YouTube to generate all available quality options for your video.
Otherwise, viewers who watch your video shortly after upload may not be able to view it in optimal quality.
Now, after selecting the video file, the following window will be displayed.

Title Section:
In the Title section, you need to write the title of your video. For example, I’ve chosen the title “How to upload a video on YouTube” for my video. Generally, YouTube video titles fall into two main categories:
- Keyword-based titles – These include important keywords to help your video rank higher in YouTube and Google search results, which can lead to more views.
- Emotional or curiosity-driven titles – These use emotional or engaging words to directly appeal to the viewer, creating a sense of need or curiosity that encourages them to click.
That’s why choosing the right title is very important and plays a key role in your video’s success.
Description Section:
Now it’s time for the description of your video. In this section, you should write a few paragraphs explaining what your video is about and what topics you’ve covered in it. Be sure to use keywords that are related to your video here as well.
Try to include the main keyword from your video title in the first paragraph. For example, my video title is “How to upload a video on YouTube”, so I also use this keyword in the description. This is very effective for your video’s SEO and can help you achieve higher rankings.
After writing your description, it’s a good idea to create chapters for your video. Creating chapters is very simple. Just write 00:00 followed by a space, then describe what that part of the video is about or what is being taught, and then press Enter.
Now let’s assume that at minute 2 of the video, we talk about uploading a video using a mobile phone. In that case, you would write:
“02:00 Uploading a video with a mobile phone”
and so on.
In future tutorials, I’ll teach you in more detail how to create professional chapters for your videos. Doing this helps your videos rank higher in both YouTube and Google search results.
In another part of the description, it’s recommended to add a link to a “playlist” or another one of your videos. Try to include a link to a video that you’ve mentioned in the video you’re uploading.
After that, if you have an Instagram page, Telegram channel, or want to create a contact point with your viewers, you can also include the address of that platform.
Finally, at the end of your description, you can add hashtags!
You need to research what specific keywords your audience uses in relation to your video, and use those keywords as hashtags. We’ll talk more about hashtag usage in the next tutorial.
There are three key points about hashtags:
- Hashtags must be relevant to your video.
- Try to use single-word hashtags as much as possible.
- There’s no exact number of hashtags you must use, but in my opinion, using 3 to 5 hashtags gives the best results, and the first three hashtags carry more weight.
Now take another look at the image above and see how I’ve written a simple description. You can also use artificial intelligence to help you write the description.
Thumbnail Section
Below the description section, you’ll find the Thumbnail section. A thumbnail is the image that appears as the cover of your video. In this section, you’ll see three options:
- Upload file
- Auto-generated
- Test and compare

If you want to choose a good-looking thumbnail for your video, you should click on Upload file and upload your custom thumbnail.
If you get an error when uploading, it’s most likely because your YouTube channel hasn’t been verified yet.
You should never use the auto-generated option! This option only lets you choose a random frame from your video, which usually isn’t very attractive. YouTube automatically selects these, and they rarely catch the viewer’s eye.
The Test and compare option is for testing different thumbnails to see which one performs best. Just click on Test and compare, upload multiple thumbnails, and YouTube will show your video to viewers using the different thumbnails you selected.
If you don’t see the Test and compare option, don’t worry — it usually becomes available after 2 to 3 months of active YouTube channel activity.
Playlist Section
The next part is the playlist section, where you should place your video in the appropriate playlist based on its topic. Playlists are essentially a type of categorization for your YouTube channel. If your topic doesn’t fit into a specific playlist, click on the “new playlist” option, choose a title for your new playlist, and complete the remaining settings. Finally, click “create.”
You can place a single video in multiple playlists.
Audience Section
The next option relates to COPPA regulations. If your video is specifically made for kids, you must select Yes.
However, if your video is intended for other age groups, select No.
⚠️ Be careful: If you choose the wrong option here, it can have serious consequences for your channel.

Paid Promotion
If your video has any sponsorships, make sure to check the Paid promotion option. I’ve never had to check this option because none of my videos have any sponsors.
Altered Content Section
The next section is Altered Content, which has been recently added to YouTube and is related to the use of artificial intelligence.
If you did not use AI in the creation of your video, check the No option.
But if you used AI in the production process in a way that significantly affects the content or shows something that is not real, then you must select Yes.

Automatic Chapters Section
The next option is about automatically dividing the video into chapters.
If you’ve already added chapter timestamps manually in the description, it doesn’t really matter whether you check this box or not.
However, if it’s enabled and YouTube can understand the structure of your video, it will try to generate chapters for you. But based on research, YouTube often doesn’t divide the content accurately.
So, I usually don’t check this option.
Featured Places Section
This section is useful if you are creating videos about restaurants, attractions, or stores. For example, when you mention or record a video at a specific public location such as, a popular restaurant, a particular store, a museum or a hotel and … .YouTube may automatically highlight that place or allow you to mark it manually. These locations may appear as a link or tag below your video or on the map.

This option is also suitable for vloggers, food bloggers, or travel streamers who typically feature public and notable locations. Therefore, it is recommended to enable this option.
Automatic Concepts Section
The next option is “Automatic Concepts”, which has been added to YouTube as an experimental feature.
If your video includes a term or concept that might not be easily understood by viewers, YouTube may automatically provide an explanation for it.
However, since this is a new feature, it generally does not function accurately. Therefore, whether this option is enabled or not does not make a significant difference.
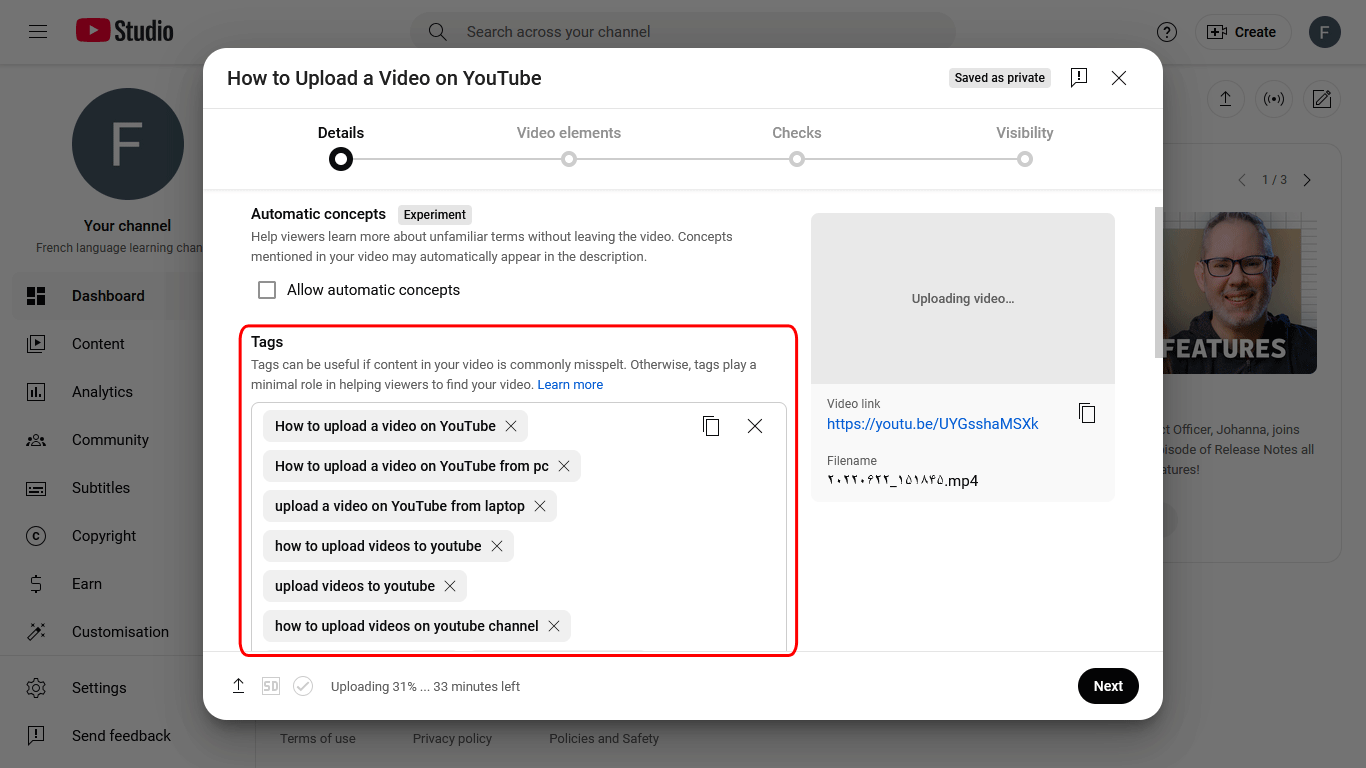
Tags Section
The next important section is Tags. Tags function similarly to the hashtags used in the description. They are essentially keywords that help your video appear in search results when users search for those terms on YouTube.
YouTube uses tags to better understand the context and content of your video so that it can suggest it to viewers who are genuinely interested in similar topics.
If the subject of your video has multiple variations or synonyms (e.g. Edit video, Trim video, Video editing, Video montage), you should include all relevant variations in the tags.
💡 How to add tags:
It’s much simpler than you might expect. Just type a relevant keyword and press Enter. There’s no need to use a hashtag symbol (#).
For example, your video title can be used as your first tag. Then, research what other related terms users might search for, and add those as additional tags.
In YouTube, there is no limit on the number of tags, but there is a 500-character limit for all tags combined.
However, the best approach for performance and SEO is to:
- 🔹 Use your video title as the first tag.
- 🔹 Add 10 to 15 targeted and relevant tags.
- 🔹 Avoid using repeated or irrelevant tags as they might have the opposite effect.
⚠️ Avoid using unrelated tags, and focus on adding multi-word phrases whenever possible, since they often have better visibility in searches.
Now take a look at the image below and review the tags I’ve entered.
Language and Captions Certification Section
In this section, you can specify the language of your video. For example, I have set it to English.
You don’t need to do anything with the “Captions Certification” option — just leave it set to None.
This option is intended for content that has been or is going to be broadcast on U.S. television. Basically, YouTube is asking:
“Does your video legally require captions under U.S. FCC regulations?”
This law applies to content such as official programs, series, or news broadcasts that have aired on U.S. TV and are legally required to include captions for deaf or hard-of-hearing viewers.
Recording Date and Location Section
Here, you can specify the recording date and location of your video content.
However, I personally never do this. because I’m always tired.🥱😴

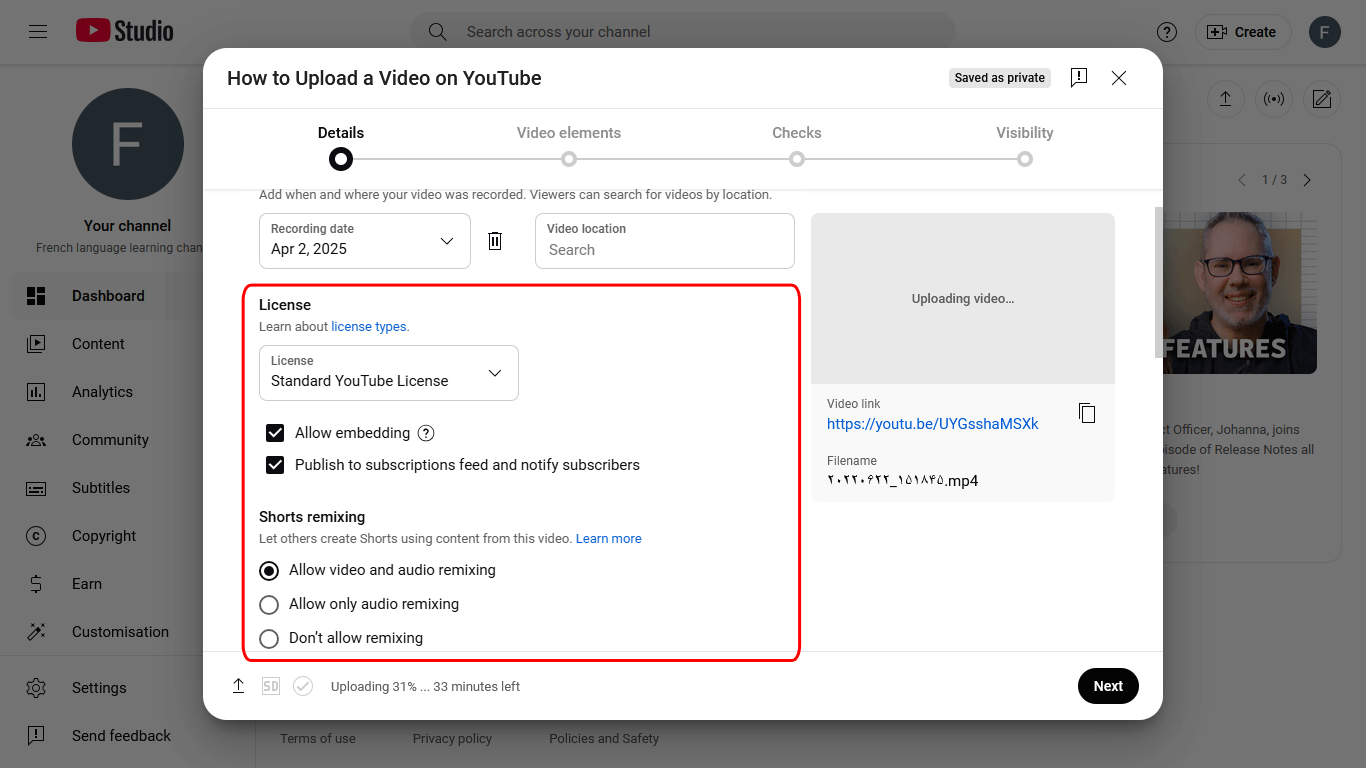
License Section
In this section, you can define the license type for your video.
If you don’t want others on YouTube to use your video without permission, set this to Standard YouTube License.
But if you want to allow others to reuse your video with proper attribution, without copyright issues, choose the second option: Creative Commons – Attribution.
I always select “Standard YouTube License”, but the choice is yours.
If you check the Allow Embedding option, it means you permit others to display your video on their websites, so their audience can watch your video directly from there.
You might wonder what benefit this gives you?
The advantage is more exposure. More people will see your content, discover your channel, and help it grow. That’s why I always keep this option enabled.
Also, since I have a personal website and embed my YouTube videos there, if I don’t enable this, I won’t be able to display the videos on my site.
Next is the option to send a notification to your subscribers so they know you’ve published a new video. So, make sure to enable the option “Publish to subscriptions feed and notify subscribers.”
Then comes the Short Remixing section.
- If you want to allow other creators to use both the audio and video of your content to make YouTube Shorts, enable the first option.
- If you want to allow only the audio to be used, select the second option.
- If you don’t want anyone to use your video for Shorts at all, enable the third option.
Category Section
In the Category section, you need to choose the appropriate topic category for your video.
For example, since my video is educational, I selected Education.
If your video is about sports, you should choose the Sports category.
Filling in the “Type”, “Problem”, and “Academic system” fields is optional, and you may leave them blank if you prefer.

Comments and Ratings Section
This option allows you to enable or disable comments on your video.
After enabling comments, In the Moderation section, you have four options to choose from:
- None – Allow all comments without review
- Basic – Hold potentially inappropriate comments for review
- Strict – Hold all comments for review until you manually approve them
- Hold all – Disable comments entirely
I usually set the moderation level to Basic.
You can also choose how comments are sorted — either by Top comments or Newest first. This setting isn’t particularly critical.
To proceed to the next step, click the “Next” button.
On this page, if your YouTube channel is monetized, you will see the Monetization section. If not, this section will be skipped, and you’ll be taken directly to the Video elements page.
If your channel is eligible for monetization, make sure to turn the Monetization switch to ON.
Video Element Window Settings
Now, let’s go through the Video Elements section:
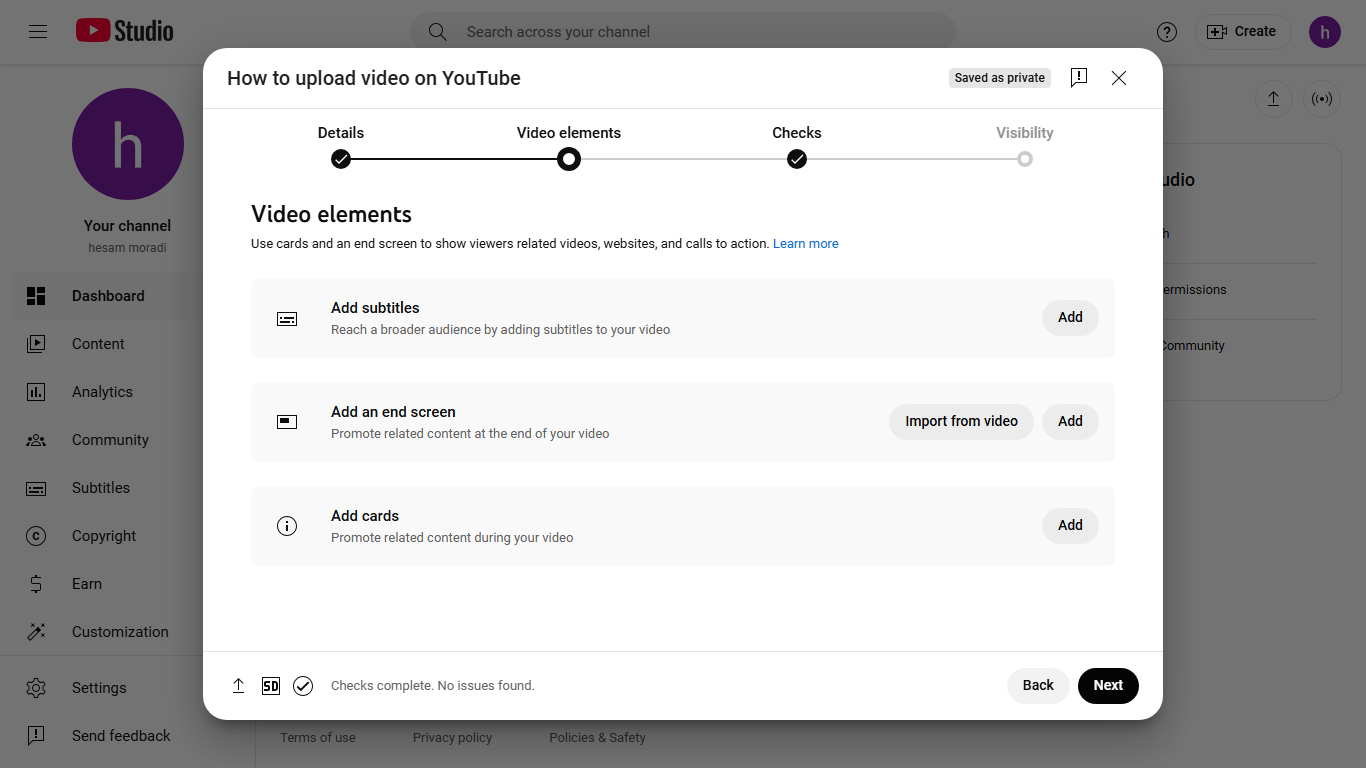
Add Subtitle:
If you want to manually add subtitles to your video, you can do so here. YouTube will automatically generate subtitles later, but they may not always be accurate.
Add an End Screen:
This allows you to add an end screen to your video, including links to other videos, playlists, or a subscribe button. Click “Add an end screen” and select the desired video. This step is optional. I will be publishing more tutorials on this topic on our website (https://ytmonetizenow.com) in the future. So make sure to follow our site regularly!
Add Cards:
Use this feature to suggest other videos during your video playback. Cards appear as pop-up suggestions at the top of the video. You can add up to five cards per video.
Once you add cards, click on “Next” to continue.
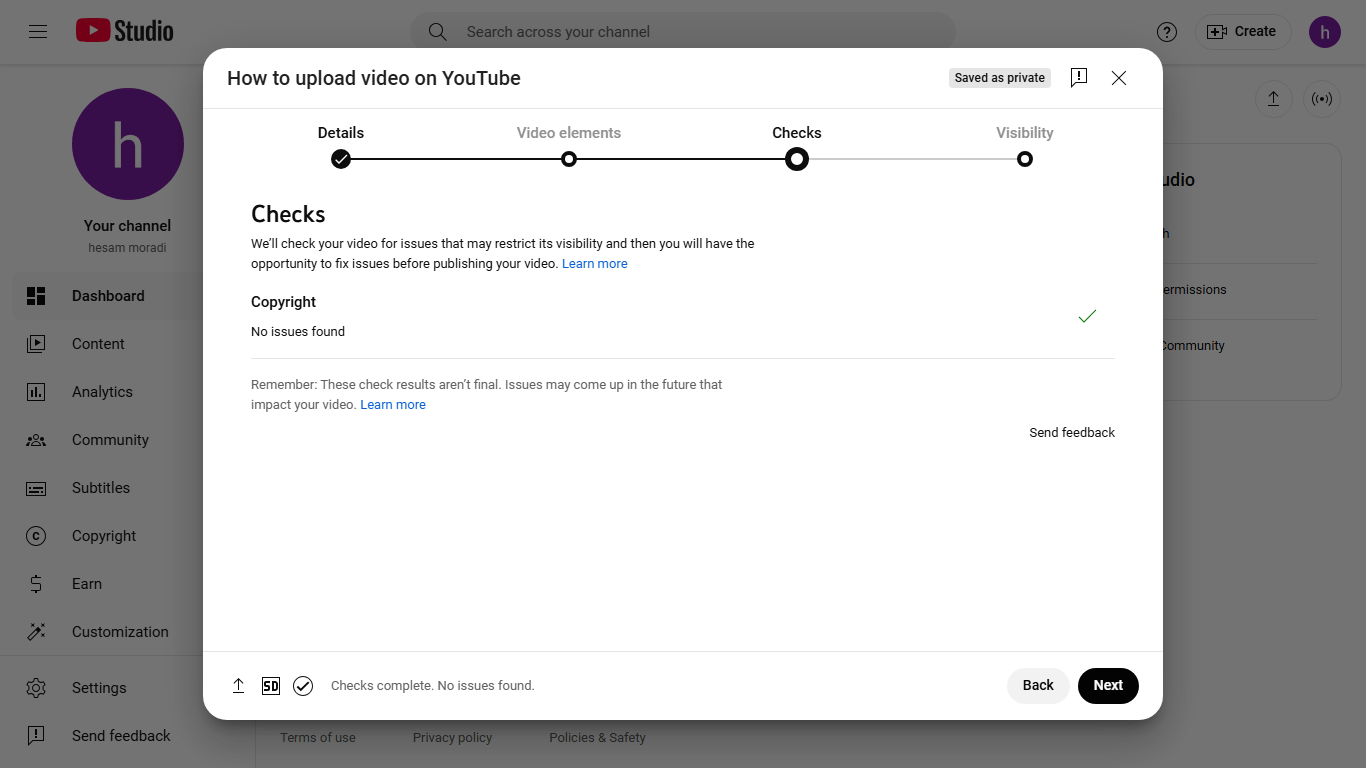
Checks window
In the next section, you’ll enter the Check stage. On this page, YouTube will scan your video to ensure there are no copyright issues. If your channel is monetized, it will also check whether your video is eligible for ad display. If everything is fine, the indicator will turn green. Once the check is complete, you can click on the Next button.
visibility window
Now, select the “Public” option in this window and finally, click the “Save” button. Other visibility options will be discussed in the next tutorial.

I hope you found this tutorial helpful. My name is Hesam, and I regularly publish new content on this website about YouTube tutorials. Feel free to visit often and check out the latest updates.
Leave a Comment