
Hey there! In this quick tutorial, I’m going to show you how to make a YouTube channel on mobile. In today’s digital world, having a YouTube channel—especially one you can manage entirely from your phone—is an amazing way to share your creativity and earn money from YouTube.
Previously, I taught you how to make a YouTube channel on laptop and PC. But if you don’t have access to a laptop or PC, follow this guide as I walk you through all the steps using just your phone.
I’ll go through the key steps to set up and grow your channel, all from your mobile device. Whether you’re an aspiring content creator or just someone looking to start sharing videos, this guide will help you get up and running with simple, easy-to-use tools.
Oh, and don’t worry—whether you’re using an Android or an iPhone, the process is pretty much the same. So, let’s dive in and get your YouTube journey started!
To create a YouTube channel using your phone, you will need four apps:
- Gmail
- YouTube
- YouTube Studio
- a browser like google Chrome
Step 1: Create a Gmail account for YouTube
The first step to having a YouTube channel is having a Gmail account. because every YouTube channel is created based on a Gmail account.
For two reasons, I suggest that even if you already have an active Gmail account, you create a new and separate Gmail account for each new YouTube channel you want to have. The first reason is maintaining security, and the second relates to YouTube’s copyright policies. According to YouTube’s rules, if you create multiple YouTube channels with a single Gmail account and receive three strikes on one of the channels, all the channels created with that Gmail account will be blocked. So, don’t take that risk and register a new Gmail for each YouTube channel.

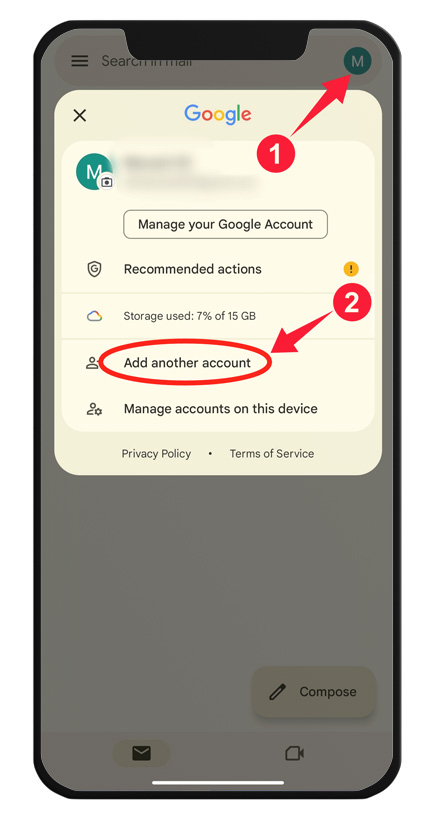
First, open the Gmail app. If you’re already logged in like I am, you’ll see this page. Now, click on your profile picture and select “Add another account.” The profile picture is circular and located in the top right corner.
However, if you’d like, you can also create a Gmail account using the Google Chrome app. To do this, click on the link below. https://accounts.google.com/signup
When the following screen appears, click on “Google”.

Finally, you will reach this page to create a new Gmail account. Click on “Create account,” then select “For my personal use.”

Now, enter your first name and last name, then click “Next.”

On the next page, enter your date of birth and gender. If you are under 18, ask an adult, such as your parent, to sign up on your behalf. This is because users under 18 may face restrictions and difficulties when monetizing on YouTube in the future. Then, click “Next.”

On this page, you will be given two suggested email addresses to choose from. If you don’t like them, you can create a custom email address by selecting the “Create your own Gmail address” . After this step, click “Next.” If your chosen email is available, the next page will appear. If not, try a different address.

After this step, you need to choose a password for your Gmail account and re-enter it in the confirmation field. Then, click “Next.”
In this step, enter your mobile number—make sure it’s a number you always have access to.
You will see a message prompting you to review your information. After reviewing and confirming your details, click “Next.”

Next, this page will appear, displaying Google’s terms and conditions. Scroll down and click “I agree.”

Step 2: Create a YouTube channel
To proceed to the next step and create your YouTube channel, open the YouTube app. If you don’t have this app installed on your phone, you can download and install it from Google Play using the link below. Download the YouTube app
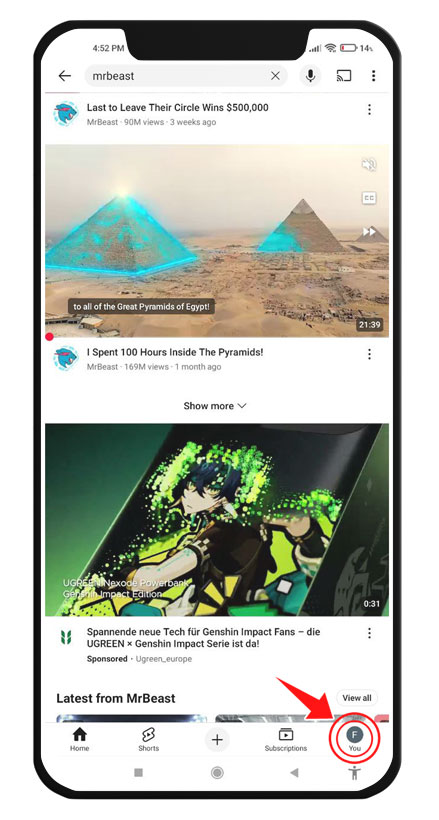
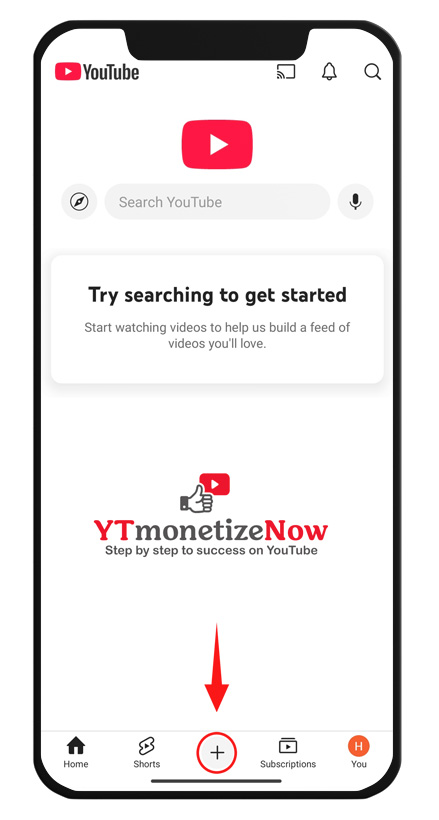
Now, open the YouTube application on your phone, as shown in the image below. At the bottom of the screen, your profile picture is located, or perhaps something similar to the human head. Click on it.
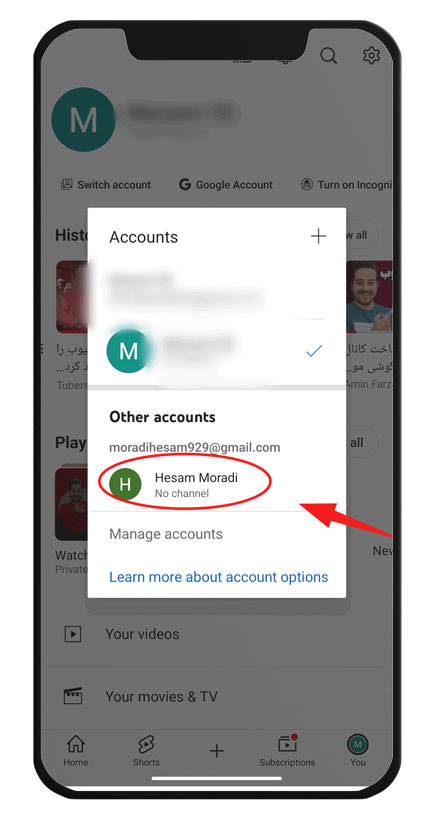
If you already have one or more accounts on the YouTube app, click on “Switch account” and select the new account you just created. If you don’t have any accounts signed in, click on the “Sign in” button. On certain mobile devices, this may be represented by a plus sign (+).
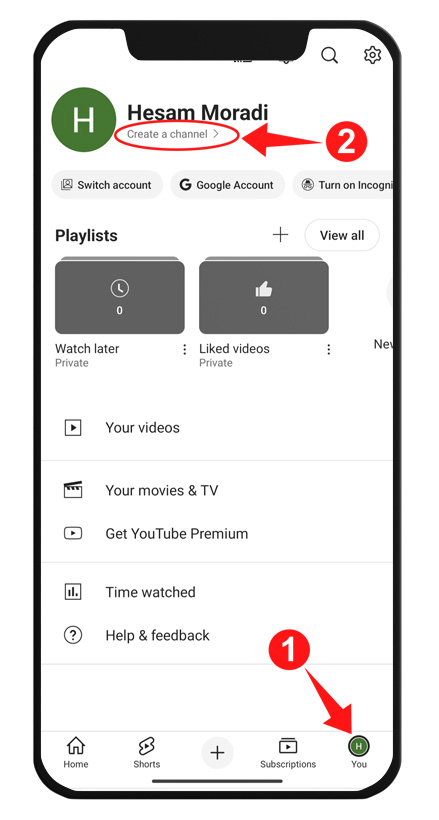
Now, click on your profile picture again in the bottom right corner. This time, a new option called “Create a channel” will appear below your name. Click on it.
In this section, you can choose a profile picture, name, and handle (URL or address your channel) for your YouTube channel. Don’t worry—you can change that later if needed. It’s best to keep the name and handle similar so others can easily find your channel. Once done, click on “Create channel.”
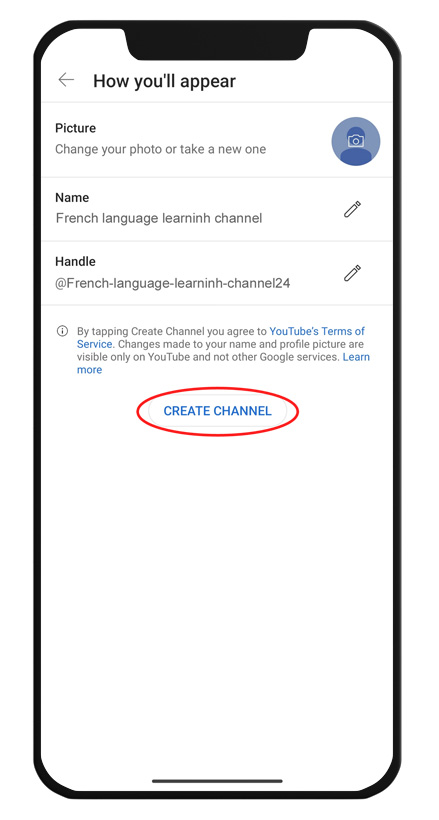
For example, in the image above, I have named my YouTube channel “French Language Learning Channel,” and the channel handle is approximately similar to it.
By the way, I only know how to say hello in French. lololol! 😂
Recently, I also learned how to say “Au revoir”. 😂
To upload videos longer than 15 minutes or set custom thumbnails for your videos, you must verify your YouTube channel with your mobile number. To do this, click on the “+” icon, as shown in the image below.
In the gallery, select a horizontally oriented video that is longer than 15 minutes, then click “Next.” It doesn’t matter what the video is about since it won’t be published on your YouTube channel. We just need a video that exceeds 15 minutes.

Now, in the top left corner, you will see a pencil icon. Click on it to enable the option to set a thumbnail for your videos.

Since your channel hasn’t been verified yet, you will see this page. Click on “Verify” and enter your mobile number. You will then receive a text message containing a code. Enter the code in the designated field and click “Next.”

As you can see, your mobile number has been verified. Now, close and reopen the YouTube app. Congratulations! Your channel is ready, and you can now upload videos you have created yourself.
Be careful never to upload videos belonging to others, as you may receive a copyright strike. If you get three copyright strikes, YouTube will terminate your channel.
Step 3: Using the YouTube Studio App for Advanced Channel Settings
The default YouTube app on Android devices does not provide full access to video settings. For example, you cannot edit the title of previously uploaded videos or change thumbnails. That’s why you need to use another app called YouTube Studio.
If you don’t have this app installed on your phone, download it from the link below:
🔗 YouTube Studio on Google Play
YouTube Studio Features
- Advanced video settings
- Edit video titles and descriptions
- Review and analyze channel statistics
- Change thumbnails (video covers)
This app helps you manage your YouTube channel, adjust video settings more comprehensively, edit the title and description of previous videos, and analyze your channel’s performance.
It’s easy to use, but I will provide more detailed tutorials on this app in future lessons. I hope I have been able to answer your question about “how to make a YouTube channel on mobile”. If you still have any questions, feel free to ask me in the comments. I will respond.


Leave a Comment